用 Hexo + Butterfly + Decap CMS + Artalk 搭建博客

之前博客搭建在 VPS,将 Hexo,Qexo (一个 Hexo CMS) 和 Twikoo (评论后台) 集成在一个容器中,构建容器的代码很复杂,可维护性也不高,包括写作过程比上传文件到服务器的方式也简化不了多少。因此重新调整了博客的方案,主要是把 🐛 满满的 Qexo 换成了 Decap CMS,配合 GitLab 的自动化部署方便了不少,也不用担心 Qexo 把好不容易写好的博客弄坏;然后就是把 Twikoo 换成功能更多的 Artalk。

已经很久没有写博客了,这篇文章就把这次的过程都记录下来,凑点年度字数。

搭建本地环境

在本地生成足够的模板文件能大幅度降低自动化部署的难度。先安装 Hexo 和 Butterfly 主题,这一步骤按照官网来。

1
2
3
4
5
6
7
# install Hexo
npm add -g hexo-cli
hexo init blog && cd blog
npm install
npm add hexo-deployer-rsync # 用于自动化部署
# install butterfly
git clone -b master https://github.com/jerryc127/hexo-theme-butterfly.git themes/butterfly

然后按照官网教程把主题改成 Butterfly,安装依赖。

虽然 Butterfly 已经很久没有添加大的新特性了,但我们仍然可以把 themes/butterfly 加进 git submodule ,让主题能自动更新。

1
git submodule add themes/butterfly https://github.com/jerryc127/hexo-theme-butterfly.git

添加 Decap CMS

Decap CMS 是一个基于 Git 的内容管理系统,原理就是通过前端直接调用诸如 GItHub 这些源代码托管平台的 API,而不需要自己手动上传。Decap CMS 和其它可选的对比可以参考这篇文章 《Hexo 博客集成内容管理系统 Decap》

Decap CMS 没有后端,取而代之的是需要 GitHub 或者其它平台的安全密钥才能正常使用,因此配置相对较为复杂。

先将 Decap CMS 添加进 Hexo 目录,创建 CMS 的入口文件 source/admin/index.html

1
2
3
4
5
6
7
8
9
10
11
12
13
<!DOCTYPE html>
<html>
<head>
<meta charset="utf-8" />
<meta name="viewport" content="width=device-width, initial-scale=1.0" />
<meta name="robots" content="noindex" />
<title>Content Manager</title>
</head>
<body>
<!-- Include the script that builds the page and powers Decap CMS -->
<script src="https://unpkg.com/decap-cms@^3.0.0/dist/decap-cms.js"></script>
</body>
</html>

然后创建配置文件 source/admin/config.yml

1
2
3
4
5
6
7
8
9
10
11
12
13
14
15
16
17
18
19
20
21
22
23
24
25
26
27
28
29
30
31
32
33
34
35
36
37
38
39
40
41
42
43
44
45
46
47
48
49
50
51
52
53
54
55
56
57
58
59
60
61
62
63
64
65
66
67
68
69
70
71
72
73
74
75
76
77
78
79
80
81
82
83
84
85
86
87
88
89
90
91
92
93
94
95
96
97
98
99
100
101
102
103
104
105
106
107
108
109
110
# source/admin/config.yml
# https://decapcms.org/docs/configuration-options/
backend:
name: gitlab
repo: Jiuh.star/blog
branch: main
auth_type: pkce
app_id: ********************
media_folder: "source/images/2024"
public_folder: "/images/2024"
site_url: "https://blog.jiuh.top"
logo_url: "https://blog.jiuh.top/favicon.png"
locale: "zh_Hans"
common_col_conf: &common_col_conf
create: true
slug: "{{fields.filename}}"
sortable_fields:
- "commit_date"
- "title"
- "date"
- "updated"
# https://decapcms.org/docs/widgets/
fields:
- label: "文件名"
name: "filename"
widget: "string"
- label: "标题"
name: "title"
widget: "string"
- label: "发表日期"
name: "date"
widget: "datetime"
format: "YYYY-MM-DD HH:mm:ss"
date_format: "YYYY-MM-DD"
time_format: "HH:mm:ss"
- label: "更新日期"
name: "updated"
widget: "datetime"
format: "YYYY-MM-DD HH:mm:ss"
date_format: "YYYY-MM-DD"
time_format: "HH:mm:ss"
required: false
- label: "封面"
name: "cover"
widget: "image"
required: false
- label: "标签"
name: "tags"
widget: "select"
multiple: true
required: false
options:
- "rust"
- "python"
- "reverse"
- "pwn"
- "web"
- "misc"
- "web"
- "lua"
- "neovim"
- "hexo"
- "good time"
- label: "分类"
name: "categories"
widget: "select"
multiple: true
required: false
options:
- "Security"
- "Tool"
- "Tech"
- "Windows"
- "Linux"
- "Good Time"
- label: "正文"
name: "body"
widget: "markdown"
- label: "原创"
name: "toc"
widget: "boolean"
default: true
- label: "评论"
name: "comments"
widget: "boolean"
default: true
collections:
- name: "2024"
label: "2024"
folder: "source/_posts/2024"
preview_path: "2024/{{filename}}/"
<<: *common_col_conf
- name: "2023"
label: "2023"
folder: "source/_posts/2023"
preview_path: "2023/{{filename}}/"
<<: *common_col_conf
- name: "pages"
label: "Pages"
files:
# - name: "friends"
# label: "友链"
# file: "source/friends/index.md"
# preview_path: "friends/"
# <<: *common_col_conf
- name: "about"
label: "关于"
file: "source/about/index.md"
preview_path: "about/"
<<: *common_col_conf
  • backend 部分是博客托管平台的配置,在我的示例中用的是 GitLab;
  • repo 是仓库名称,可以使私有仓库;
  • media_folderpublic_folder 是图片资源的存放位置和链接前缀;
  • site_urllogo_url 是网站地址和 LOGO 的地址;
  • locale 是内容管理系统的显示语言;
  • common_col_conf 是自定义的一个块,里面是文章 front-matter 元数据的描述,比如标题、发表日期等;
  • collections 是集合,如果你的博客文章都放到一个目录里,这里就只需要配置一个,如果是像我一样分开放的,那就一个一个都配置上;

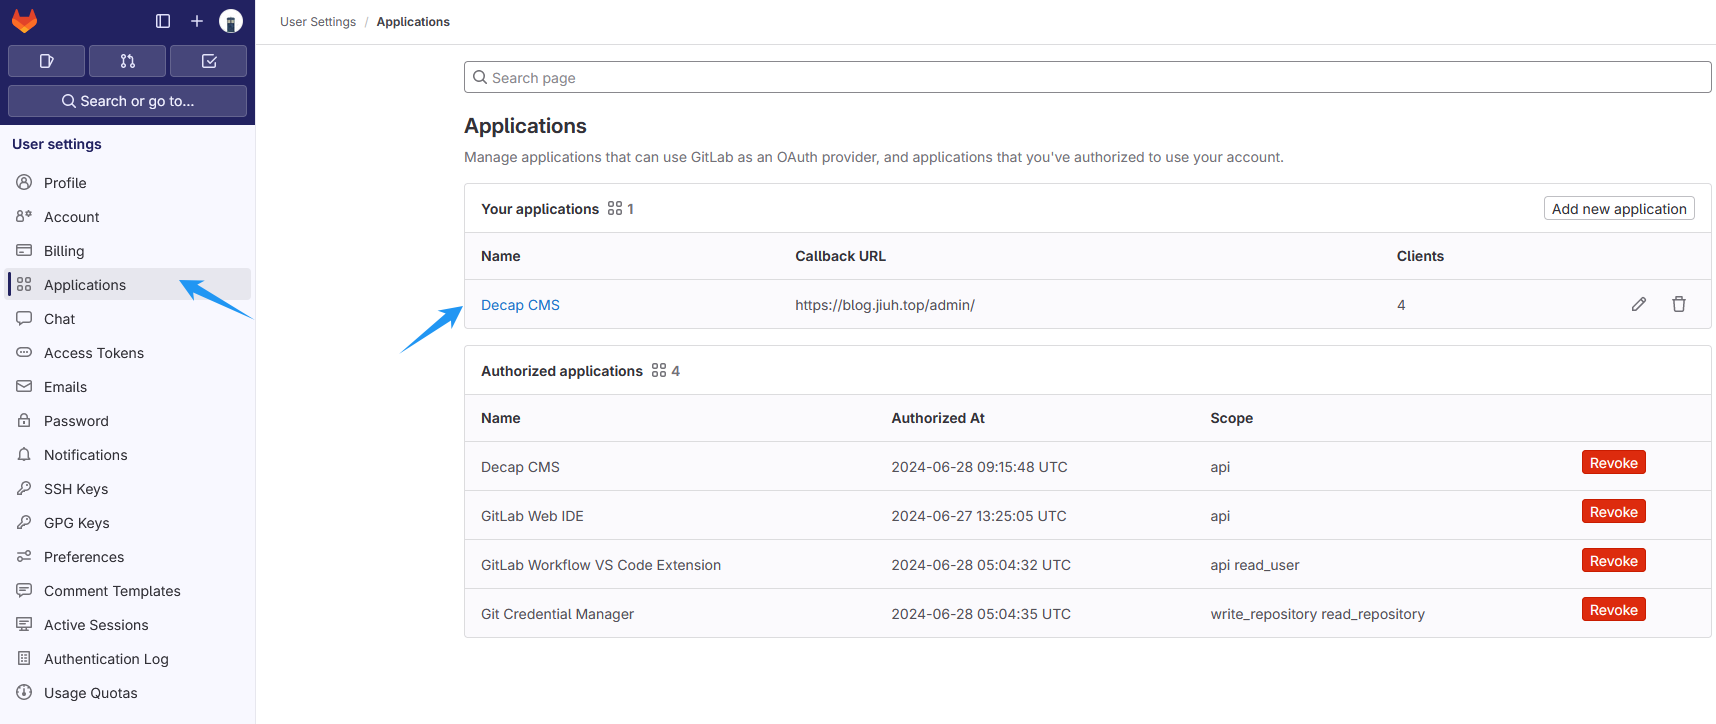
Decap CMS 支持 GitHub,GitLab,Gitea 和 Bitbucket 等源代码管理平台,详细的设置方法可以参考官网文档,以 GitLab 为例,将创建的 Application ID 复制到配置文件 source/admin/config.yml 对应位置中,并且设置 auth_type: pkce

创建 GitLab Application ID

另外,还需要修改 Hexo 的配置文件 _config.yml,让它原样输出 source/admin 目录下的文件。

1
skip_render: admin/**/*

如果一切顺利的话,访问 https://博客地址/admin 用 GitLab 登录,就可以开始写文章啦。

自动化部署

准备密钥对

要将仓库的文章部署到 VPS 上,需要免密登录 VPS,因此需要将 VPS 生成的私钥放到仓库的自动化管道中,VPS SSH 开启公钥登录。为了安全起见,先创建一个不允许密码登录的新用户:

1
sudo adduser --disabled-password blog_deployer

创建一个 SSH 密钥对用于部署 ,不要输入密码!

1
ssh-keygen -t ed25519 -f ~/blog_deployer

我们使用 GitLab 偏好的 ed25519 加密算法,它基于椭圆曲线,相比 RSA 性能更好,具有更好的密码学属性。然后将公钥添加进授权密钥列表文件 ~/.ssh/authorized_keys 中。

1
2
sudo -u blog_deployer mkdir ~/.ssh
cat ~/blog_deployer/id_ed25519.pub | sudo -u blog_deployer tee ~/.ssh/authorized_keys

保存密钥 $private_key 到一个安全的地方,密文内容如下:

1
2
3
4
-----BEGIN OPENSSH PRIVATE KEY-----
...
...
-----END OPENSSH PRIVATE KEY-----

需要注意的是,SSH 对于密钥文件的权限极其敏感,如果发现 CI/CD 登录失败,很有可能就是这里出了问题。可以用 /usr/sbin/sshd -d -p ${port} 开启一个新的 SSH 守护进程进行调试。

设置 GitLab CI/CD

GitLab 的 CI/CD 由 gitlab-ci.yml 设置,我个人感觉比 GitHub 的 GitHub Action 方便很多。首先先向 GitLab 提供我们的 SSH 私钥 ($private_key),以便我们的 CD 进程可以将构建发布到 VPS。

一种比较方便的方式是给向 CI/CD 配置中添加两个环境变量 (settings > CI/CD > Variables)。

变量名称 变量内容
SSH_PRIVATE_KEY 生成的 SSH 私钥 $private_key
SSH_KNOWN_HOSTS VPS 的指纹,也就是 ssh-keyscan 博客地址.blog 的输出结果

最终应该看起来像这样:

GitLab Variables

其中,SSH_PRIVATE_KEY 可以设置为 protected,但是需要注意要同时设置 protected branches,否则会报错。

1
2
$ echo "$SSH_PRIVATE_KEY" | tr -d '\r' | ssh-add - > /dev/null
Enter passphrase for (stdin): ERROR: Job failed: exit code 1

接下来就可以愉快地编写.gitlab-ci.yml了。我的脚本由两个阶段组成:builddeploy。在阶段 build,我们使用最新的 Hexo,Butterfly 生成我们的博客内容,并且存储 public/ 下的内容 (只保留 30 分钟,避免耗尽资源)。在阶段 deploy,我们配置 SSH,然后将上一步生成的输出同步到 VPS。

1
2
3
4
5
6
7
8
9
10
11
12
13
14
15
16
17
18
19
20
21
22
23
24
25
26
27
28
29
30
31
32
33
34
35
36
37
38
39
40
stages:          # List of stages for jobs, and their order of execution
- build
- deploy

image: node

build:
stage: build
script:
- apt update -y && apt install git -y
- npm add -g hexo-cli
- npm install
# downlaod the theme
- git submodule sync --recursive
- git submodule update --init --recursive
- node -v
- npm -v
- hexo -v
- hexo clean && hexo g
artifacts:
paths:
- public/
expire_in: 30 minutes
only:
- main

deploy:
stage: deploy
script:
- apt update -y && apt install openssh-client git rsync -y
- eval $(ssh-agent -s)
- echo "$SSH_PRIVATE_KEY" | tr -d '\r' | ssh-add - > /dev/null
- mkdir -p ~/.ssh && chmod 700 ~/.ssh
- echo "$SSH_KNOWN_HOSTS" > ~/.ssh/known_hosts
- chmod 644 ~/.ssh/known_hosts
- npm add -g hexo-cli
- npm install
- hexo d
only:
- main

每当有新的内容提交到仓库的 main 分支,GitLab CI/CD 就会将生成的内容发送到 VPS。这里我们使用的是 hexo d 命令,使用 rsync 进行实际的推送,因此 VPS 上需要安装并启动 rsync 服务。_config.yml 上相应的配置修改为:

1
2
3
4
5
6
7
8
9
deploy:
type: rsync
host: jiuh.top
user: blog_deployer
root: ${部署文件夹}
port: 22
delete: true
verbose: true
ignore_errors: false

另一个值得注意的是,Windows 下的 cwrsync 需要 cygwin openssh,如果使用 Windows 11 内置的 openssh 会报错。

反向代理

下面是 Caddy 设置静态文件服务器的例子,还是比较方便的。

1
2
3
4
5
6
7
8
9
10
11
{
email your-email@example.com
}

博客地址 {
encode zstd gzip
root /root/servers/blog
file_server {
precompressed
}
}

需要注意的是 Caddy 的用户是 caddy:caddy,可能会有文件权限问题,导致 403。一种方法是将 caddy 加入blog_deployer 用户组中 (usermod -aG blog_deployer caddy),然后重启 (因为只有当 caddy 登录时才会实际执行该操作)。另一种方法就是将 Caddy 设置为 root 用户启动 (即修改 /etc/systemd/system/multi-user.target.wants/caddy.service)。

到这一步访问 https://博客地址 就能看到博客页面,访问 https://博客地址 并登录 GitLab 就能看到 Decap CMS。

Artalk 评论系统

Butterfly 支持很多评论后台,其中 Artalk 算是我个人比较喜欢的一个 (Twikoo 也不错),功能也更多,能完美满足我的需求。

我用 Podman 构建 Artalk 容器。在 Podman 高版本中,可以编写下面的 artalk.container 并把它放入 /etc/containers/systemd 中,用 systemctl 对其进行管理。这样做的好处是该容器在上游更新后,本地镜像也会同步更新。

1
2
3
4
5
6
7
8
9
10
11
12
13
14
15
16
17
18
19
[Unit]
Description=Artalk server
After=network-online.target

[Container]
ContainerName=artalk
Image=docker.io/artalk/artalk-go:latest
AutoUpdate=registry
Environment=ATK_LOCALE=zh-CN ATK_SITE_DEFAULT=Artalk ATK_TRUSTED_DOMAINS=https://blog.jiuh.top
PublishPort=7000:23366
Volume=/root/servers/artalk/data:/data

[Service]
Restart=on-abnormal
RestartSec=5s
KillMode=mixed

[Install]
WantedBy=default.target

systemctl daemon-reload 应用 Systemd 文件更新,然后启动 Artalk:systemctl start artalk.service。通过 podman ps 可以看到 Artalk 已经启动。

1
2
CONTAINER ID  IMAGE                                 COMMAND               CREATED        STATUS        PORTS                    NAMES
111111111111 docker.io/artalk/artalk-go:latest server --host 0.0... 1 minutes ago Up 1 minutes 0.0.0.0:7000->23366/tcp artalk

执行命令创建管理员账户:

1
podman exec -it artalk artalk admin

通过 Caddy 暴露在公网中:

1
2
3
4
5
6
artalk.jiuh.top {
encode zstd gzip
reverse_proxy 127.0.0.1:7000 {
header_up X-Forwarded-For {header.X-Forwarded-For}
}
}

Artalk 界面

修改 _config.butterfly.yml,应用 Artalk:

1
2
3
4
5
6
7
8
9
10
11
12
13
14
15
16
17
18
19
comments:
# Up to two comments system, the first will be shown as default
# Choose: Disqus/Disqusjs/Livere/Gitalk/Valine/Waline/Utterances/Facebook Comments/Twikoo/Giscus/Remark42/Artalk
use: Artalk
text: true # Display the comment name next to the button
# lazyload: The comment system will be load when comment element enters the browser's viewport.
# If you set it to true, the comment count will be invalid
lazyload: true
count: true # Display comment count in post's top_img
card_post_count: true # Display comment count in Home Page

# Artalk
# https://artalk.js.org/guide/frontend/config.html
artalk:
server: "https://artalk.jiuh.top"
site: "Artalk"
visitor: true
option:
pvEl: "#ArtalkPV"

当使用 Artalk时,Butterfly 使用 Artalk 而不是 busuanji 记录文章访问人数。但是 Butterfly 的默认配置不知道为何无法生效,因此需要添加 pvEl: "#ArtalkPV" 临时解决这个 🐛。但是由于缺失 data-page-key,导致所有页面共享一个计数,只能等待上游修复这个 🐛。


结语

写累了,就这样吧,希望明天也开开心心的~